In Defense of the “Curator” Metaphor

Adapted from a talk I gave on August 16th for the Northbay Business Referral Group.

The term “curator” gets bandied about a lot lately. Several bloggers have commented on this, and it is a legitimate gripe. It’s natural, I think, for a new idea to slosh about a bit, sometimes splashing messily, before it finds its level. However, just because an idea gets overused by some enthusiastic promoters doesn’t mean it isn’t valuable. With that in mind, I leap to the defense of the curator metaphor. Here’s why:

I’ve volunteered in my local museum, and have seen curators at work.

  • When you’re a curator, you depend, to at least some degree, on others to provide artifacts to exhibit.
  • These artifacts might arrive in a dilapidated state and need some cleaning or fixing up.
  • The person bringing the artifact may not be entirely clear on its significance, necessitating some research.
  • Some of the artifacts that are brought to the museum might not turn out to be relevant to the museum’s topic and must be rejected.
  • If there are gaps in the topic that need to be addressed, you might need to go looking for other relevant artifacts.
  • You need to decide how to display the artifact, determine where it goes in relation to everything else, put it in its display case or on its plinth, and write up the little sign next to it that explains what it is and how it is significant.

Without all of this work, the artifacts in a museum would be a random pile of junk. With all of this work, the museum presents a pleasing, understandable picture of its chosen topic, whether it is a period of history, a place, the natural world, a technology, or anything else. In marketing terms, the museum can now present a coherent message.

A parallel occupation that has been in the information curation world for many years is the technical writer. I choose this occupation not only because I am one, but because it is a relatively mature occupation, and fairly well defined in comparison to, say, social media. (No sarcasm intended.) A document, particularly in the technical writing world, is much like a museum exhibit:

  • You, the writer, depend on subject matter experts (often called SMEs) for your material.
  • The material is often not suitable for the intended audience. This is no reflection on the SME; their job is usually to speak to other specialists, after all.
  • Connections may need to be made from SMEs’ contributions to the larger body of information.
  • Material needs to be selected for relevance; if something is outside what the audience needs, it needs to go.
  • If there are audience needs that your SMEs cannot meet, you need to educate yourself on that topic and find the necessary information.
  • The disparate materials need to be massaged for their level of detail, terminology, tone, and many other things. They need to be put in a logical order, and supporting materials like indexes and tables of contents must be created.

The result, when this work is done well, is a coherent, organized document that gives an audience exactly what it needs.

As you might guess from what I’ve been saying so far, there is one criticism of the “curator” meme that I agree with, and that is the casual application of the term. The museum curator’s job is not easy; it requires work and substantial knowledge and training. In the same way, a technical writer’s job is far from trivial.

  • Simple aggregation of material adds some value, but not a lot.
  • Adding commentary to an item is better.
  • Organizing the content and providing context is even better.
  • Structuring the content to an audience’s needs is better still.

As with the rest of life, you get out what you put in. If you want to add value to your content, do the work.

Removing End-of-Line Carriage Returns

A nuisance I face now and then in my work is text that has carriage returns not only at ends of paragraphs but at ends of lines as well. The text might have been exported from another program or another file format, and the export filter added these carriage returns in a misguided effort to preserve the line lengths. Exported texts of e-mails are a frequent offender here.

Sample text document, showing extra returns at the end of each line

This becomes a problem the moment you edit the text enough to affect the length of a line (and it doesn’t take much). You create breaks in the middle of a line that can be mistaken for paragraph breaks.

Text has been added, pushing the carriage return to the next line

Also, if you change the margins, you get the same thing everywhere.

Margins have been shortened, forcing many line breaks

What to do, what to do?

A Simple Search and Replace is Not the Answer

Beware of using a simple search and replace to get rid of these:

  • Often, there are no spaces before these extra returns. If you blindly remove them, there will be word pairs run together at random places in your document, and no easy way to find them.
  • A blind search and replace also removes the returns at the ends of paragraphs—which you want to keep—leaving you with a document-long wall of text.

The Solution

The good news is there is a quick and easy remedy requiring only the search and replace function provided on nearly every text editor. The trick is to preserve the returns you want by putting them temporarily out of reach, and the key to this that paragraph breaks, also being line breaks, are double returns.

Note: Your search and replace function needs to be able to find invisible characters. Microsoft Word uses the wildcard string “^p” for this. I also find it helpful to have invisible characters visible.

Note: This procedure assumes your document does not contain long strings of spaces (which some writers use instead of indenting) or long strings of carriage returns (which some writers use instead of page breaks). I do not recommend either of these practices.

Removing First Spaces

  • If there are spaces at the beginning of each line, use the search and replace function to replace all carriage returns followed by spaces with carriage returns alone.

Placing the Dummy String

  • Pick a dummy text string (I usually use “@@@”). Search to make sure it doesn’t appear anywhere in your document.
  • Use the search and replace to replace every double carriage return with the dummy string.

Now each paragraph break you want to keep is safely hidden as a dummy string.

Removing Extra Returns

  • Check whether the end-of-line returns have spaces in front of them.
  • If the end-of-line returns have spaces in front of them, replace all carriage returns with nothing. If the end-of-line returns do not have spaces in front of them, replace all carriage returns with spaces.

You now have a single mass of text running the length of your document. We’ll fix that next.

Restoring Paragraph Returns

  • Replace the dummy strings with carriage returns.

You should now have carriage returns where you want them, and nowhere else.

Double Spaces After Periods

Spacing twice after a period is no longer a common practice. However, if you double-space after periods, the procedure above will leave you with a single space after any periods that formerly appeared at the end of a line. Here’s how to fix that:

  • Replace all periods with periods followed by spaces.
  • Replace all periods followed by three spaces with periods followed by two spaces.
  • Repeat the previous step several times to make sure you’ve removed all the extra spaces.

Building a Spiral Staircase in Blender Using the Array Modifier, Part 3

Over my previous two posts, I’ve been documenting a procedure to make a spiral staircase using the free open-source 3D modeling program, Blender (see www.blender.org for more about the program itself). As I’ve said in Part 1 and Part 2, I believe this method, which uses the Array modifier, is a bit more flexible than most other methods I’ve seen, which use the Dupliframes function.

If you haven’t read the previous two posts, I recommend you do, since I won’t be recapping them here.

Part 2 ended with the size and shape of the risers finalized, but their shape still blocky. Today we’ll add some detail.

Image

Linking Array Displacement to the Empty

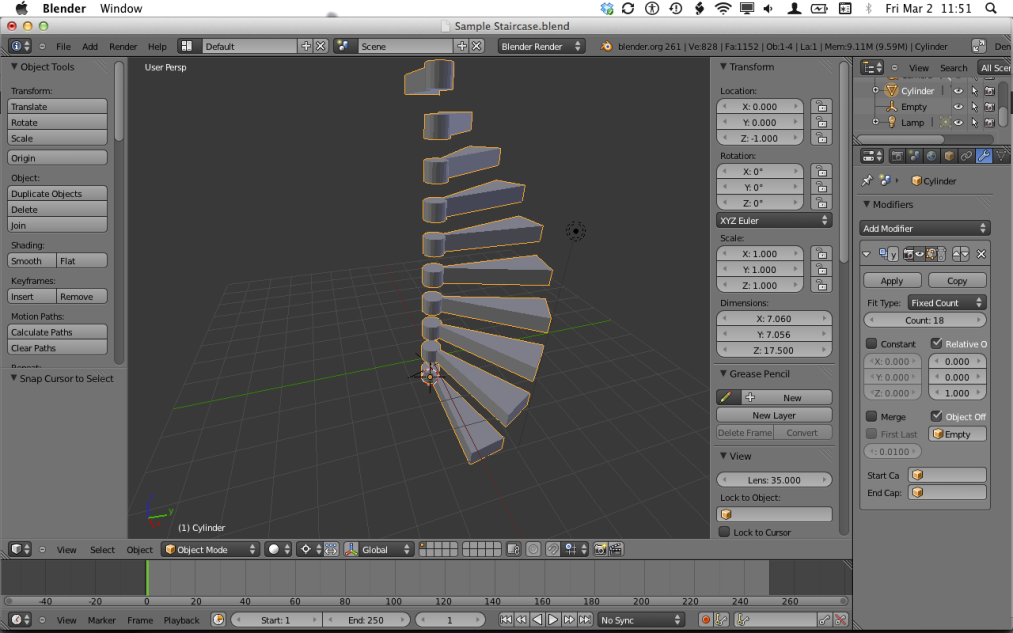
Until now, we’ve been telling the Array modifier to simply shift each duplicated riser up one riser height. Today we’re going to be changing the shape and height of the riser, but want the risers to stay put.

  • If necessary, switch to Object mode (press Tab), and select the bottom riser.
  • If necessary, display the Properties sidebar (N), and note the object’s height in the Transform section, Dimensions area, Z field. If you haven’t moved it, this field is located at the top of the Properties sidebar.
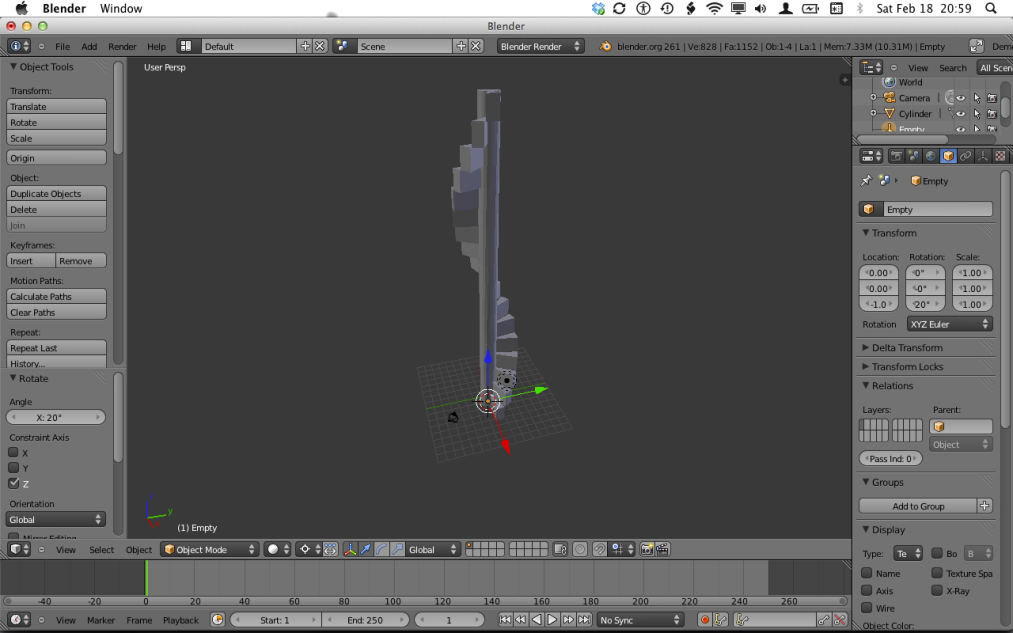
  • Select the Empty you used to set the riser rotation in Part 2. The same Z field you read the value from in the previous step now shows the value for the Empty. Enter the value you noted in the previous step in the Z field there.
    You might notice that the duplicated risers have jumped. Don’t fret; we’ll fix that next.

Image

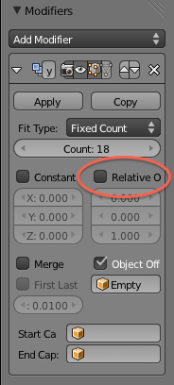
  • Click the staircase to select it. In the Properties window, for the Array modifier, click Relative Offset to de-select it.

Image

  • You will notice that the risers have shifted back. You can now use the Empty to control the risers’ vertical shift as well as their rotation. Try it if you like.

Editing the Riser Shape

We’ve done a good job getting the risers where we want them, but they still look blocky and bare. I’ll show you some ways to add detail.

Remember, because we’ve used a modifier to duplicate a single riser, any modifications we make to that one riser will be reflected in all the others.

Adding a Handrail

Next, we’ll duplicate and modify some of the riser’s own geometry to make handrails. Note that I’m showing a staircase with a central post in these examples, but the technique works just as well on an open-core staircase.

  • If necessary, switch to Edit mode (Tab).
  • Select the two outer top vertices on the riser.

  • Duplicate the selected edge (Shift-D).
  • Constrain the duplicate edge’s movement to the Z axis (Z), and drag the edge to about the height you want the railing to be. You can easily change the height later.

  • If necessary, select the 3D cursor as the pivot point.

Selecting the 3D cursor as the pivot point

  • With the edge still selected, scale it along the X and Y axes (S, Shift-Z) until the resulting face is as wide as you want the railing to be.

  • Select the entire face you just created (Ctrl-L), and extrude it upward along the Z axis (E, Z) until it is the height you want the rail to be.

You now have a rail segment, and thanks to the same Array function that duplicates the stair risers, that rail segment is duplicated for every tread on the staircase. The problem is the rail segments are flat, and most stair railings curve upward smoothly. We’ll fix that now.

  • De-select the top of the rail (A twice), and select all the vertices on the end of the rail that needs to be higher.

  • Move the end of the rail segment to meet the end of the rail segment above it. You can do this two ways:
    • Move the selected end along the Z axis freehand (G, Z, and drag). This is not exact, but it isn’t difficult to get a good-looking result.
    • Measure the exact height of the riser. (Select two points on a vertical edge of the riser, click Edge Length in the Mesh Display section near the middle of the Properties sidebar; the length of the selected segment appears next to the segment.) Re-select the end of the rail and move it along the Z axis this amount (G, Z, and type the amount).

You now have a smooth handrail running the entire length of the flight of stairs. However, it’s simply hanging there with no support. We’ll take care of that next by adding uprights (the proper name for them is “balusters.”)

Adding Uprights

You’ll need to do a tiny bit of math for this. The numbers you calculate here ensure that all the uprights are evenly spaced along the flight of stairs. You don’t have to space them evenly of course, but it looks a lot better if you do.

  • Decide how many uprights you want. Multiply that number by three, and subtract one.
  • Ring cut the rail segment (Ctrl-R while the mouse cursor is over one of the long edges), and press Page Up to add more cuts until the number of cuts equals the number from the previous step. The image below shows eight cuts—for three uprights.

Rail Ring Cuts in Progress

Rail Ring Cuts Done

  • De-select the ring cuts you just made (A twice).
  • Select the second face along the bottom of the rail segment, then select every third face along the bottom of the rail.

  • Shrink the selected faces slightly using the Smooth tool (W, then select Smooth from the popup menu). Do this again if you want the uprights narrower. The image below shows the faces smoothed twice.

  • Extrude the selected faces downward along the Z axis (E, Z, and drag) until they are about level with the top of the riser.

  • With the ends of the uprights still selected, flatten them by scaling them vertically to zero (S, Z, 0). If necessary, move the ends along the Z axis (G, Z, and drag) until they are slightly below the top surface of the riser.

  • If you’re making a staircase without a central post, you can use this same technique to make a second railing along the inner edge of the staircase.

You’ve finished your staircase. Congratulations!

Suggestions for Adding Additional Details

While you now have everything a functional spiral staircase needs, the whole thing is rather blocky and plain.

It’s beyond the scope of this procedure to try to walk you through everything that’s possible, but I can give you some suggestions on how to go beyond with a little decorative flash.

  • A little work with the Ring Cut and Scale tools we’ve already used, and you can change the profile of the handrail (remember to change the pivot to Median Point, or you may get some weird results):

  • A similar approach can quickly and easily spruce up the uprights as well:

  • The same holds true for the risers themselves:

Conclusion

I hope this three-part procedure has been helpful. I’ll be adding to this blog with more procedures on making architectural elements in Blender, but I don’t know when I’ll be able to. With a little luck I should have another in a few weeks.

I welcome suggestions on how this and future procedures can be made better.

Thanks for stopping by.

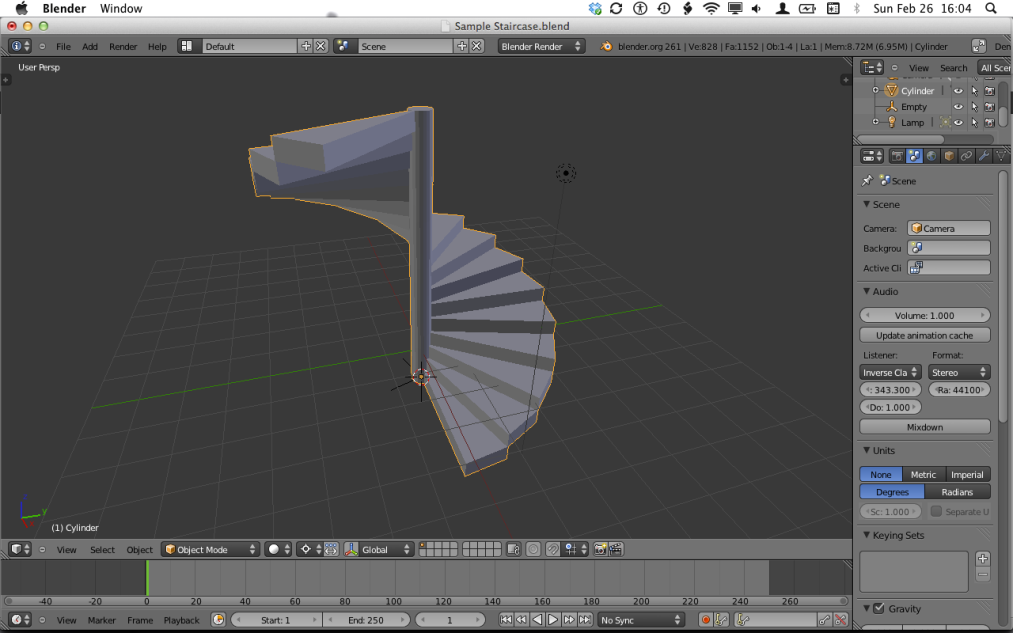
Building a Spiral Staircase in Blender Using the Array Modifier, Part 2

In my previous post, I began to set down a technique for creating a spiral staircase in the open-source 3D modeling program, Blender (see the Blender site for more about the program). Unlike most procedures I’ve seen for doing this, this technique uses the Array modifier instead of the Dupliframes function. In fairness, I must admit I didn’t do a terribly thorough search; there may be other procedures out there.

I recommend you read the previous post if you haven’t.

My last post ended with a full turn of the staircase created, but with the risers oddly sized.

Image

As you’ll see in today’s post, this is not any kind of issue, because you can change the size and shape of the riser at almost any time; this freedom is why I like this technique.

Re-Sizing the Risers

  • To change the height of the riser, change to Edit mode if necessary (Tab), select all the vertices at the top of the riser, and move them on the Z axis (G, Z, and drag).
    Because the modifier moves each duplicated riser vertically exactly one riser-height, the duplicated risers scoot down automatically.

Image

  • To change the outer radius of the riser, change to Edit mode if necessary (Tab), select all the vertices at the outer rim of the riser, and scale on the X and Y axes (S, Shift-Z, and drag).

Image

  • (For staircases with a central post) To change the diameter of the central post, change to Edit mode if necessary (Tab), select all the vertices of the post, and scale on the X and Y axes (S, Shift-Z, and drag).

Image

  • (For staircases without a central post) To change the inner radius of the riser, change to Edit mode if necessary (Tab), select all the vertices at the inner rim of the riser, and scale on the X and Y axes (S, Shift-Z, and drag).

Image

  • Use the previous four techniques as needed to get the results you want.

Here’s what I settled on (at least for now):

Image

Next time, I’ll add some handrails, and start detailing these dull, boxy risers into something more interesting.

Building a Spiral Staircase in Blender Using the Array Modifier, Part 1

Introduction

Many procedures for creating spiral stairs in Blender use the Dupliframes function, but I find this method locks me in, making changes difficult. The method I describe here has more wiggle room, allowing me to make alterations as I go to get the results I want.

For this procedure, I’m assuming you know your way around the Blender interface, so I won’t give all the fine details of using the functions. Some tutorials that cover this are available from Blender Cookie and Blend Tuts.

Setting Up

  • Start with the cursor where you want the center base of the staircase to be. Use Snap (Shift-S) to put the cursor at the center of the workspace or to a selected object, or use the Properties sidebar (press N, and find 3D Cursor on the sidebar) to place the cursor exactly where you want it.

Blender with an empty scene

  • Decide how many steps will make up one complete turn of the staircase. For this example, I’ll say 18 steps. 360° / 18 = 20, so there will be 20 degrees per step.
  • Decide whether you want a shaft down the middle of the staircase. (Builders call this shaft a “newel post.”) If you want a post, go to the next part. If you don’t go to the part after the next, “Creating the Bottom Step for a Stair without a Post.”

Creating the Bottom Step for a Stair with a Post

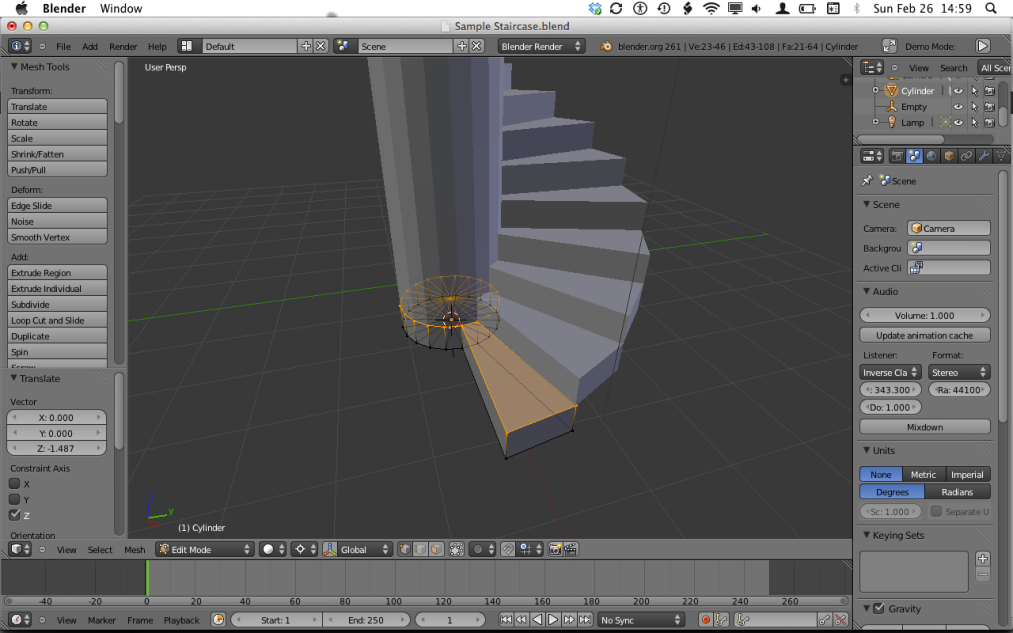
  • Create a cylinder with a number of vertices equal to the number of steps per turn that you chose before. Don’t worry about the dimensions of the cylinder yet.
  • Switch to Edit mode (Tab). Select one of the cylinder’s perimeter faces.

Newly placed cylinder with one segment selected

  • Extrude this face (press E), but press Esc or tap the mouse button to prevent the extruded face from moving. The extruded face has been created at this point, it simply hasn’t moved.
  • If necessary, set the Pivot Point to the 3D Cursor (see below).

Making the 3D Cursor the reference point for resizing

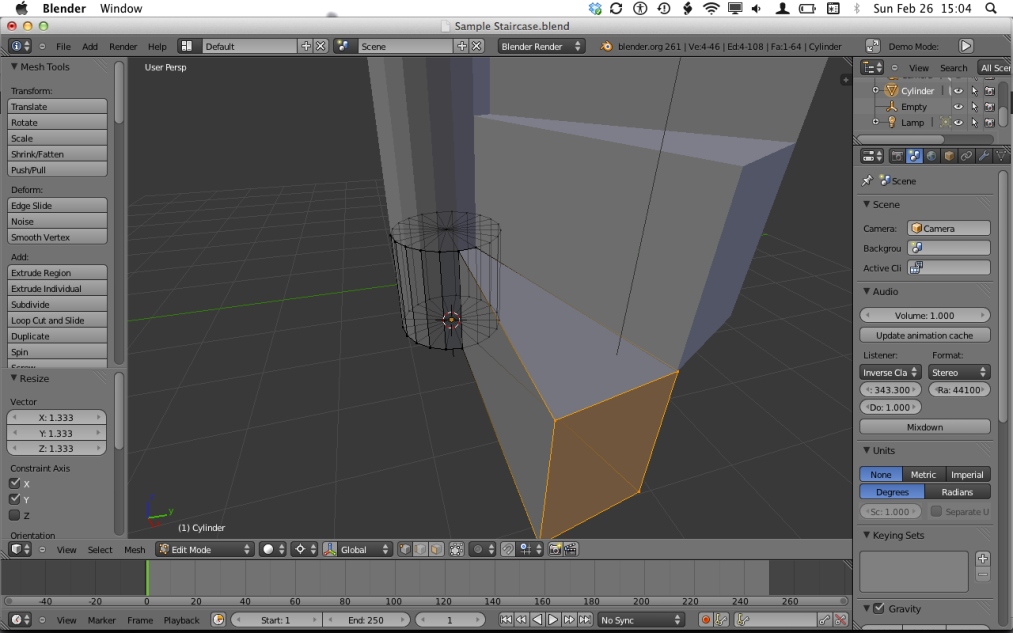
  • With the extruded face still selected, scale (S) along the X and Y axes only (Shift-Z). This ensures the tread top and bottom stay flat.

Tread during extrusion

  • You now have a completed single step. Feel free to jump ahead to adding the Array modifier, or proceed to the next part if you want to make a step without a central post.

Creating the Bottom Step for a Stair without a Post

This might seem cumbersome while I’m explaining it; it’s one of those things that’s easier to do than say, so please bear with me.

  • Use the Add menu (Shift-A) to add a plane.

  • Tab to switch to Edit mode, and subdivide the plane (W, and click Subdivide on the popup menu).

  • Shift-click the center point and the point closest to you to deselect them, then press X to delete all the remaining points. This leaves you with two points at either end of a line segment (in Blender, this is called an edge).

  • Select the point at the 3D Cursor. Press G to grab that point, then X to constrain its movement to the X axis. Drag until the edge is the length you want the stair tread to be. Don’t worry about being precise; you can change it later.

  • Ensure that both points at the ends of the edge are selected. In the same way you extruded the other step, extrude this edge (E), then press Esc or click the mouse to stop it from actually extruding.
  • Rotate the newly extruded edge (R), then constrain it to the Z axis (Z). Because we want each step to take 20°, constrain the rotation to 20° (press 20 during the rotation). You now have a flat, pie slice-shaped object.

  • Now all we need is to give it some height. Select the entire mesh (press A twice), extrude (E), and constrain to the Z axis (Z). Drag until it’s about as high as you want, and click to accept the extrusion. Again, you can change the height later, so don’t obsess.

  • You now have a completed single step. Feel free to proceed to adding the Array modifier.

Setting up the Array Modifier

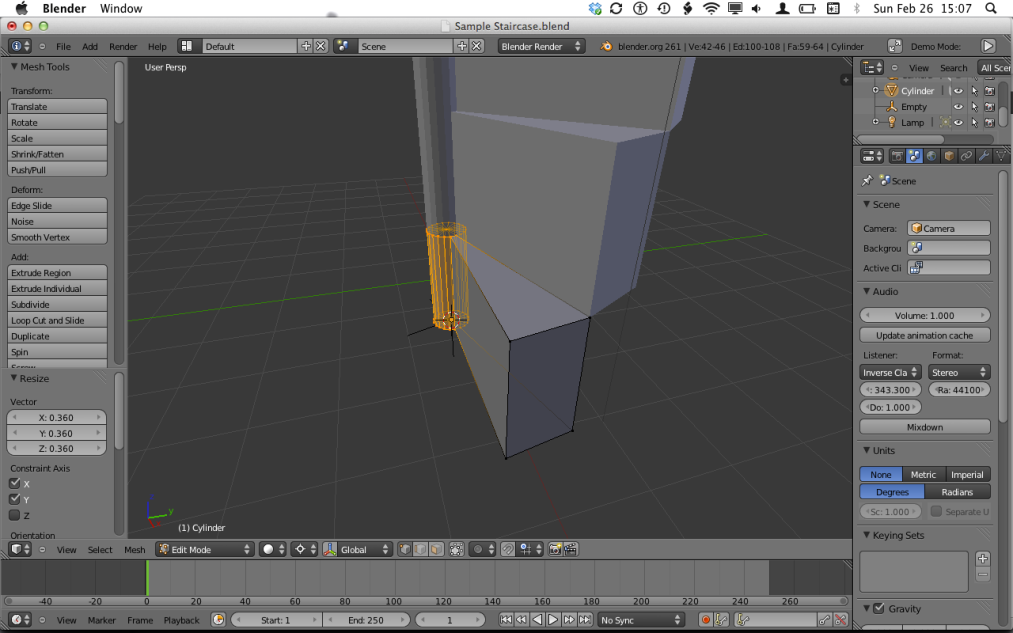
  • If necessary, make hidden lines visible.
  • Click the center point of the bottom of the cylinder to select it.
  • Move the 3D Cursor to that point (Shift-S, and click Cursor to Selected).

3D Cursor moved to the bottom of the tread

  • Move the object’s center to the 3D Cursor (Shift-Ctrl-Alt-C, and click Origin to 3D Cursor).

Tread origin moved to its bottom center

  • Return to Object Mode (Tab).
  • Use Add to place an empty mesh at the 3D Cursor (Shift-A, and click Empty). By default, it is named ‘Empty.’

Adding the Array Modifier

  • Click the tread to select it.
  • Using the Add Modifier in the Properties editor, add an Array Modifier.

Adding the Array modifier

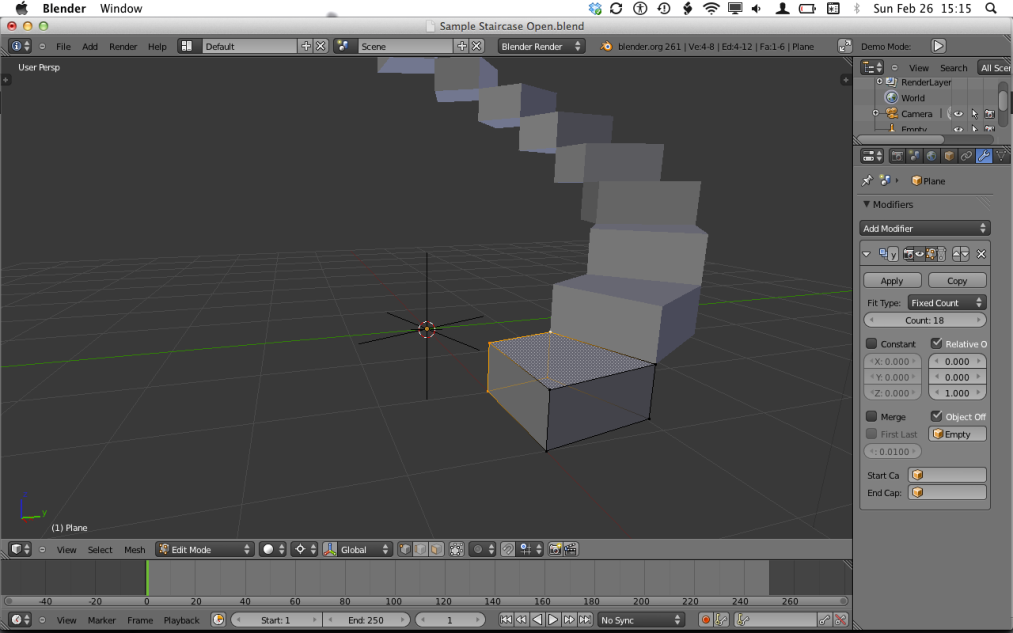
  • In the modifier’s settings, set the Count value to 18. This will give us one full turn of the stairs.
  • In the Relative Offsets (below the Count value), set the X offset (the first value) to 0, and the Z offset (the third value) to 1.
  • Click Object Offset (below the Relative Offsets) to select it. Click the field below, and select Empty in the pop-up menu. This makes the tread take on the displacement and rotation of the Empty.

Tread duplicated by the Array modifier

  • Select the Empty and rotate it 20° on the Z axis. Because the Array modifier is applying the rotation of the Empty to each object in the array, each duplicated tread rotates by that amount.

Step with Post, Duplicated and Rotated


Step without Post, Duplicated and Rotated


  • Problem is, the tread is probably far too thick, but we’ll fix that easily in the next installment, and also add handrails.

Building a Toroidal Planetoid in Blender

Maybe it’s because I read The Little Prince at a young age, but I’ve always liked the idea having a tiny planetoid to explore, like a secret garden. Yeah, I know the physics of a habitable planetoid are ridiculous, but this is one case where I don’t care.

Here’s an attempt to make a torus (doughnut)-shaped planetoid in the free 3D modeling program called Blender. For more about this amazing program, see www.blender.org or one or the excellent user forums such as the Blender user community or BlenderArtists.org. For those who want to know, I started this model in Blender 2.5, and am currently using 2.61.

This is meant to be very introductory and not an exhaustive tutorial on how to make things in Blender; there are plenty of those already. Some of the best I’ve used have been Blender Guru and Blender Cookie, but you’ll find many at the forums in the previous paragraph.

Eventually, I want to make it possible to move a virtual camera over this interestingly-shaped landscape in real time, in the manner of a first-person shooter, using Blender’s game engine. That’s a whole other project; for now it’s pre-rendered stills and video only.

Here’s a render:

Building

I started with a simple torus, made using a standard primitive with a few tweaks to the dimensions:

Then I used a subsurface modifier (3 levels for the working view, 4 for rendering) to add more surface detail:

Now that there was plenty of geometry to work with, I used a displace modifier to deform that geometry. This modifier takes the color or grayscale values of the pixels in an image and uses them to control how much the surface is distorted relative to its normal (the direction perpendicular to its face). I used Blender’s “Clouds” texture with almost no tweaking…

…and got results that I liked. Here are the before and after:

Texturing

Next, I added some color by importing a material from the Blender Presets collection. This one is called Earth_terricciogillan, and has the rough sandstone look that I wanted:

Here’s a render with the material applied:

Grass

Nice so far, but much too barren. Time to add some vegetation. Like many 3D tools, Blender has a particle system for animating systems of particles acting together, like fire, water, or smoke. That same tool can render an object along what would have been the particle path. The result is long strands radiating out from an object, like hair or grass.

I created a particle system, and played with the waving and clumping settings until I had results that I liked:

Yes, I know the grass looks like solid color blobs from this distance. That’s not critical at this point.

Trees

Grass was not enough for me. I wanted my planetoid lush.

First, I generated a tree using the Add Tree tool. The default settings made for too barren-looking a tree for my taste, so I tweaked them to get some more branch subdivision and consequently more leaves. I wanted some cool, dappled light under my canopy of trees.

Yes, I know the tree is sideways. This is because I’ll be using another particle system to place trees on the planetoid, and particle systems align objects along their X axes. That means that if it’s straight up-and-down here, it’ll be lying on the ground when the particle system places it.

For this particle system, in the Render section of the Properties bar, I choose Object, and then selected “tree” (the name of the tree object) in the Dupli Obj box.

One thing that’s kind of tedious is that the trunk and branches are one object and the leaves are another. That means I need two particle systems, one for each object. It’s not much of a big deal though; I simply duplicated the first particle system and only changed which object the second system uses. That way each system uses the same positioning data, and I won’t have a lot of bare dead trees along with bunches of leaves floating in the air.

Here’s the result:

With even a cursory glance at this picture you can tell that all the trees are identical to the last detail. To help hide this, I set the Rand bar at the bottom of the Render section 0.37. This means each duplicated object is scaled by a random amount not to exceed 37%.

Here’s a final Render:

Meta-Data and Single-Source Documents: a Primer

Adapted from a speech I gave on 20th October, 2011

If you’re not in the technical writing field you might think we writers sit down to write documents, whether they’re manuals, procedures, or what have you, and trot them off one at a time. Write it up, finish it, and send it off to the printer. Now, you probably think I’m going to chuckle and say it goes onto a CD-ROM or a web page or a help file instead of a printer. You would be right in thinking that; electronic media are important, and becoming more important all the time. But that isn’t what I’m talking about.

What I am talking about is that sequence: Start a document, finish it, and start a new one. That’s what’s called a one-off process; each document is a unique creation. The problem with that is that from one version to the next, at least some of the information is the same. Take legal disclaimers, or company contact information, for starters. Not only that, but from one product to another, at least some, and frequently much, of that information is the same. Copying that information from one product, version, or edition to another is at least simplified somewhat by copying and pasting, but that only helps you so much. When it comes time to update some of that shared material, you have to make sure it’s updated for each product and document that uses it, whether the manuals, brochures, web pages, help files, data sheets…I think you can see what a snarl and a nightmare this is becoming.

A mountain of paper

What my to-do list would look like under a one-off publishing model

The answer to this problem is what we in the industry call single-sourcing. Instead of a separate electronic file for each manual, brochure, web page, help file, data sheet, and so on, you have, ideally, all the material in one electronic file. One. All the parts of this potentially huge document have meta-data tags, hidden strings of text that never appear in a finished document. These tags specify where and how these parts get used.

Text bracketed by meta-data tags

One way to view meta-data tags in an XML file (an XML version of the author’s resume)

Say you’ve got a procedure with a step that applies to product X but not product Y. You apply some tags to that step that say something like “product X, yes; product Y, no.” At print time, you order your software to “print a product Y manual.” A program called a parser goes through and pulls only the stuff that’s tagged for that product, and that step that doesn’t apply gets ignored; it doesn’t appear in the final manual.

It’s as though everything is highlighted. You can go through and say, read all the stuff highlighted in yellow and red, but ignore the green and blue.

Text highlighted in multiple colors

What tagged text might look like as highlighting

Now expand that idea further. That same large file can have parts that not only go into brochures, data sheets, but also web pages, help files, or theoretically anything. Because it’s all data, the software can create any of those documents by transforming and re-formatting the information in the source file as needed. You want a web page? Tell your parser to spit one out. That means that any information that’s used in more that one place only appears in the single-source file…once and only once. And that means that I, the beleaguered technical writer, need only change it…once. That means fewer opportunities for errors.

If this sounds more like a database than a book, that’s because it is. Publishing and database programming are converging, and the publishing business is never going to be the same again. We’ve come a long way from the editor with the green visor, but I think that that editor hunched over his manuscript would still respect this process, because the goal is the same as it’s always been in the publishing business: getting the right information to the right people at the right time.

Old-World Manners, Endoprhins, and Hats

Walking home yesterday, I came upon a large truck that had pulled forward to better see traffic and was blocking the sidewalk. As I was preparing to walk around, the truck reversed and pulled back, allowing me to pass. I waved my thanks and moved on, wishing I had a hat to tip.

Old-world gentleman tipping his hat to a lady

Showing us How it’s Done

I enjoy the occasional times I wear hats, because you can tip them. It’s a tiny leftover of victorian and/or edwardian manners that still has some meaning to us today. No doubt there are scores or hundreds of other intricate mannerisms that would baffle all but a few of us; I must ask some Dickens Fair goers the next time I’m there. Whatever the case, when I wear a hat, tipping seems somehow natural. It’s fun, and people respond to it with an easy smile, even when it’s abbreviated to touching the hat brim just so.

Tom Waits tipping his hat

Thank You for the Demonstration, Mr. Waits

A greeting is an acknowledgment of you as a human being, a statement that you matter and are worth at least a moment of attention, just as that truck driver took the trouble to get out of my way, even though he didn’t have to. Because it’s associated with the upper class, tipping a hat takes on the additional weight of being an acknowledgment from someone who matters, whatever the actual social stations of the people involved. Certainly there were problems with victorian-style class distinctions, and I would not have them back, but this is one case where we’ve kept the good and lost the bad, thank goodness.

It Goes for Ladies, Too

Just search for endorphins and kindness and you’ll find all kinds of research that acts of kindness, whether given or received, cause our bodies to produce the natural opiates that induce a sense of well-being. I don’t know how scientifically accurate these articles are, but I do know I feel good when I tip my hat.

Sihouette of a hat-tupping gentleman

‘Ta!

Are Online Media Turning the Whole World into a Small Town?

Many of us, myself included, are troubled by the loss of privacy that new media represent. Maybe we just need some historical context.

For most of human history, people lived in small communities. That meant in towns, or on a farm shared by their extended family, with the occasional trip into the nearest town for supplies.

Even if you lived in a city, whether it was Rome, London, Alexandria, Chichen Itza, or Beijing, chances are your world was quite circumscribed. Most of your family probably lived nearby, and the vast majority of your furniture, household items, clothing, food, and nearly everything else came from within a few tens of miles of where you lived. Traveling outside your home city was difficult, dangerous, and infrequent. If you traveled outside the city with any kind of frequency you were quite an unusual person, and everywhere you went people would ask you for news about the places you’d been.

Leisure travel was not common until the industrial revolution. The Romans had resort towns, such as Baiae and Capri, but they were for the wealthy. The earliest known instance of the word “tourist” was in 1772, and “tourism” did not come along until 1811. The idea of the Grand Tour as an educational, character-building exercise has been around since 1660, but only for the upper class.

Capri, a look from Santa Serafina, by Johann Wilhelm Schirmer

Capri in 1840

For most of human history, people stayed within their local communities, interacting with the same people you interacted with day in and day out. In such circumstances, like small towns today, there isn’t a lot of privacy; everyone pretty much knows everyone else’s business.

Is is possible that the notion of anonymity within a large community that we are accustomed to today is a temporary side effect of industrialization? Before rail travel it was possible to lose yourself in another community where no one knew you, but hardly anyone did because it was too difficult. After the railroads (and later, internal combustion), you could move on, and slow communication meant you could leave your identity behind.

A crowd of workmen celebrate of completion of the Transamerican Railroad

Completion of the U.S. Transcontinental Railroad, 1869

Today, communication is faster, and your identity follows you. With new media, you could make a case that the entire planet now operates like a small town. Perhaps that is the default human condition, and online communication is simply restoring it.

If so, did my generation and the one or two before mine simply have a reprieve? Maybe I just need to grumble under my breath and learn to live with it. On the other hand there’s always space travel…